Unique DIY Ideas for Travel Lovers
 Posted by Shu Wen
Friday 7 Dec 2018
Posted by Shu Wen
Friday 7 Dec 2018
Share
Travel the world seems to be almost everyone's dream. Traveling is fun and memorable whether it is a solo travel or with loved ones and friends. Going around places and collecting those memories are just something enjoyable. From collecting the train tickets, stamps and postcards, all these are such memorable pieces to own and lovely to reminisce from time to time. If you are drawn to anything crafty that is related to travel, this article is definitely meant for you.
Even if traveling is not something near yet a goal for you in the near future, these simple DIY ideas can serve as an inspiration or motivation for you. Or they can be simple a good home decor at your home!
1. Easy DIY Scratch Off Map
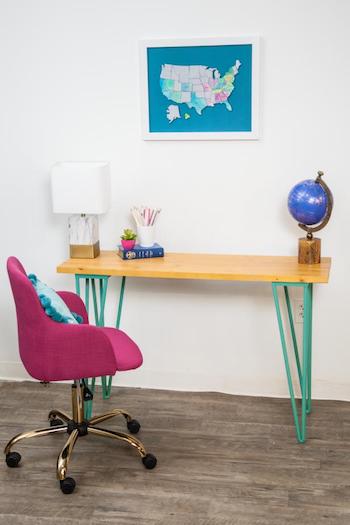
Source: Travel Channel
Have you ever heard of setting a SMART goal? Well, you can totally imply this for your traveling dreams too, I mean goals. This DIY scratch map is absolutely the perfect idea to be:
- Specific in your goal. It is always good to start with something small and from there go for the big ones. Because it is the very first step that matters. If you wanna start traveling, you can start traveling within the States. If you are from Asia, then start covering places in Asia.
- Measurable. With this map, you would be able to see how many states have you covered and look forward in covering the next one.
- Attainable. Realistic. Timely. Well, of course this would have to depend on how your saving plan is for each travel. And they are absolutely realistic, come on!
This scratch off would be fun and satisfying, as it gives a colourful visual display of where you have accomplished. And cross it off each time you have visited the place.
Materials you need:
- wooden puzzle map
- watercolour paint and a cup of water
- paintbrushes
- clear wax crayon
- dish soap
- metallic acrylic paint
- super glue
- wooden frame
Steps:
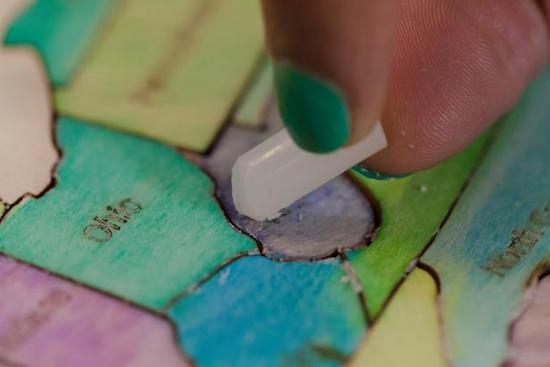
1. First start off by water coloring each states on the wooden puzzle map. Paint with colours of your choice. Do not worry about painting within the lines because those puzzle pieces will be removed.
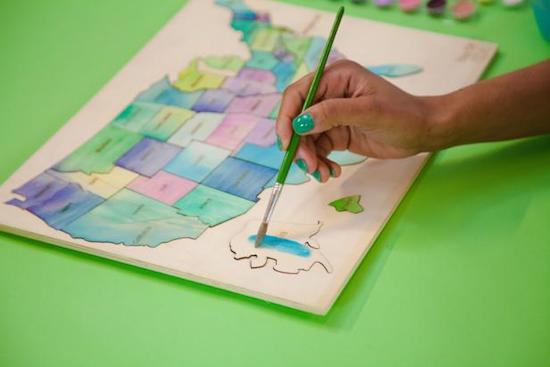
2. Once the water colour has dried up, use a clear wax crayon and colour a layer of it all over the states.
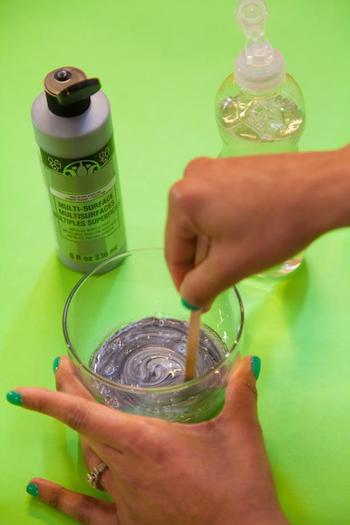
3. In a container, mix an equal amount of the metallic acrylic paint and dish soap. For this, silver paint is used. You may opt for gold colour if you prefer that. This step is for the top coating of the map.
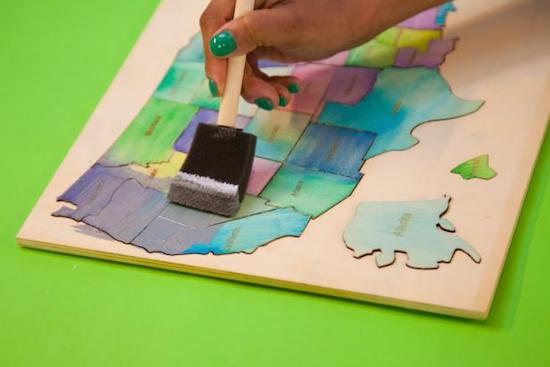
4. Then, apply the mixture with a sponge brush. Have them coated with two layers of the mixture. After that, let it dry.
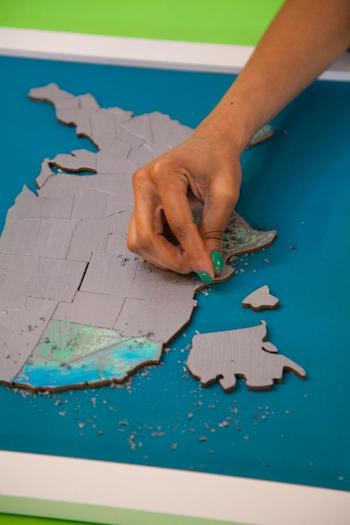
5. Once they are completely dry, remove the pieces carefully and transfer them to another frame. Stick those pieces with super glue.

6. Finally scratch off the places you have been and it is ready for display!
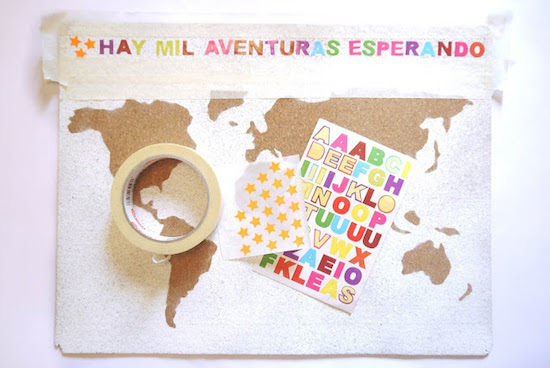
2. Travel Map with Spray
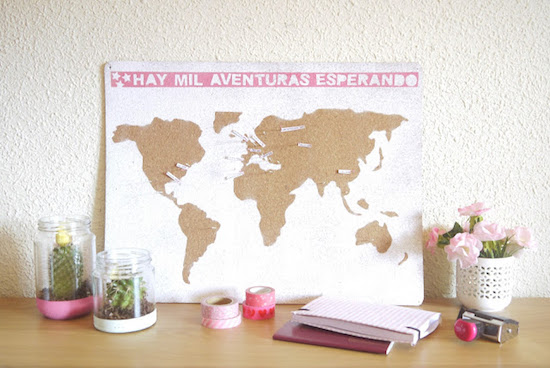
Source: Mi Armario Coqueto
If you wish to dream bigger, go for this world map! Easy to make, just some spray and you are good to add and mark them your own way. For this idea, it would be great for you who loves to pin photos, date or anything on the map.
Materials you need:
- cork
- spray paint (colour of your choice) for this is white and pink
- pins
- scissors
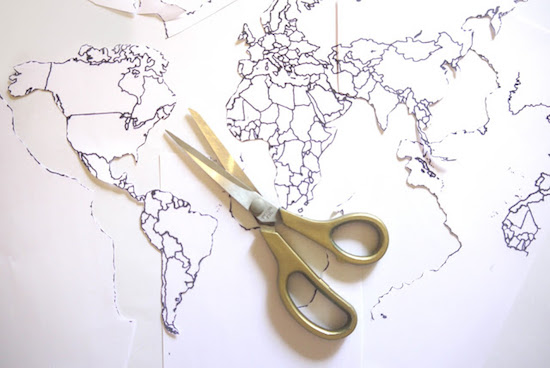
- world map template
- letter stickers
Steps:
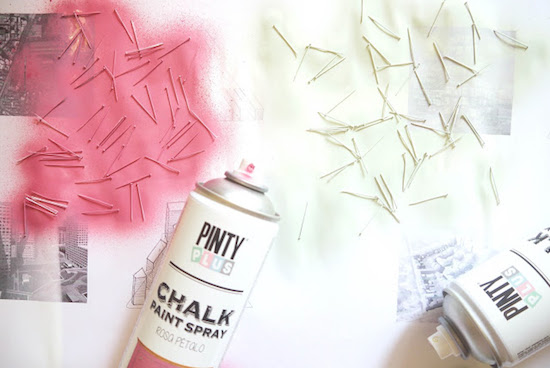
1. First, print out the map template and cut the shape out using scissors.
TIPS: Do not have to be so precise, just ensure that you have all the continents identified. One recommendation is to have the corners rounded as sharp edges usually does not turn out well on corks.
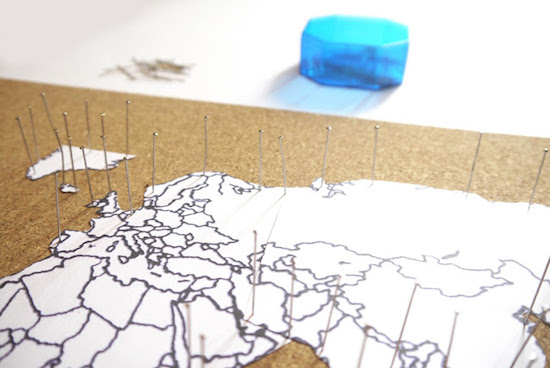
2. Next, lay the map of the cork and pin them in place. Secure it with as many pins as possible.
TIPS: Do not remove the pins once you have poked them as you will leave a hole on the cork as you spray later.
3. Then, spray the entire surface with two layers as the cork will absorb the sprays.
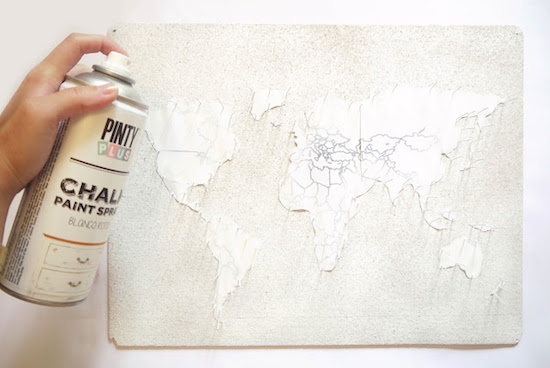
4. If you feel that the map alone seems a little to simple and plain, feel free to have a title above it. Add colours by spraying it with another colour of paint.
5. As you let the cork board dry, spread out a handful of pins on left and right and spray them with white and pink. They can serve as markers of places you have been or wish to go!
6. Then add tags with the name of the places and date.
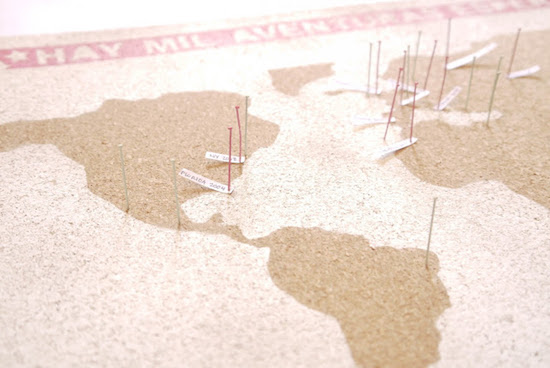
Well, this is just one of the idea. You can totally play around with strings that pulls and tied to a photo. Add whichever and whatever you like. Then place this cute cork world map at your desk or hang them on the wall.
3. Map Magnets

Source: The Happy Housie
Maybe you ain't got a space for those big maps? No worries these map magnets can satisfy your wanderlust too! These small little magnets can hold up any memo or photos on the fridge with the same effect of the map too! Well this would be much more a space saver!
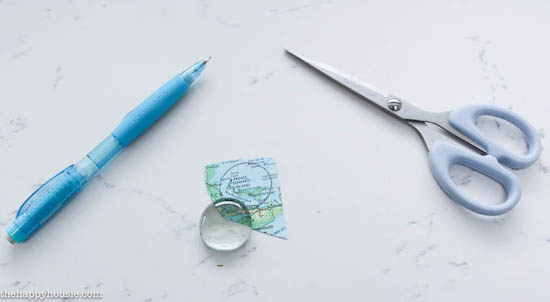
Materials you need:
- clear, round glass rocks (you can find them at the floral section of the dollar store)
- Mod Podge
- paintbrush
- scissors and pencil
- maps to cut up
- magnets
- hot glue gun
Steps:
1. First, on the map. Locate a place you wish to cut it out. Trace it with the glass rocks and cut out the shape.
2. Apply Mod Podge (a waterbase sealer / glue) at the back of the glass rocks and stick it on the map. Ensure the map fits the shape of the glass rocks.
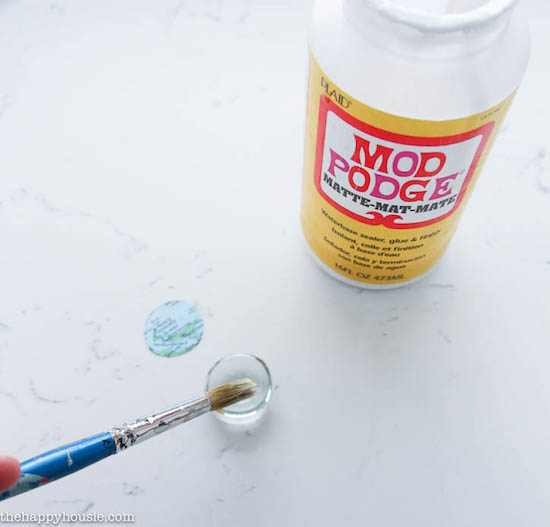
3. Then let it dry. Attach the magnet onto the back with a hot glue gun.
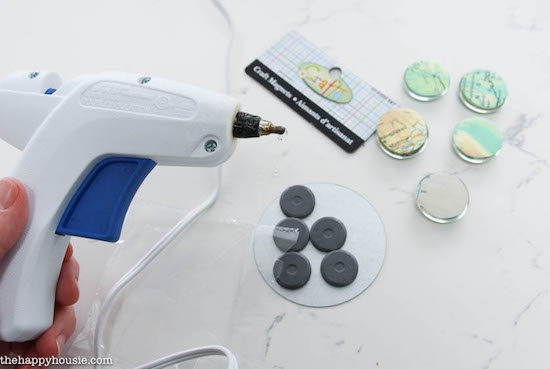
TIPS: Make sure you use decently size/ strong enough magnets to hold up the weight of the rock and in addition to the paper.
Aren't they cute? They are like popping bubbles on your fridge. Definitely a perfect addition to it or to any magnetic board!
4. Travel Momento Boxes
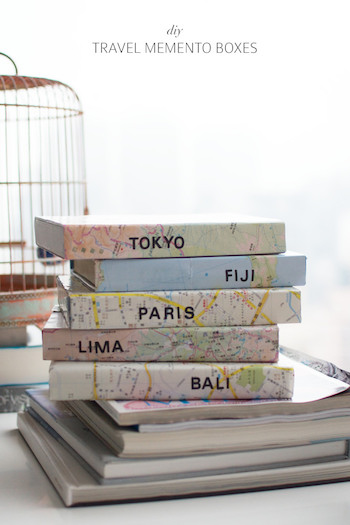
Source: A Pair & A Spare
Love keeping those little memories with you whenever you have been to a certain place? Keep them in these momento boxes. If you are a keeper, this idea would be great. Keep anything from train tickets, entry tickets, seashells, dried leaves to postcards. Anything that reminds you of that special place, let this momento be kept close to the heart and home in this boxes. Simple and yet organised.
Materials you need:
- a few small boxes / DVD boxes
- maps
- glue
- letter stickers
Steps:
1. Wrap the boxes with the map. Ensure the sides are nicely wrapped and folded. You can actually wrap it the way you want it, depending on the types of boxes you get.
2. Stick them securely with glue or double-sided tape.
3. Then, label the sides with name of the places with the letter stickers.
4. Once labelled, gather all the tiny memories and keep them in the box.
You can stacked these momento boxes on the shelves and they are perfect as decor too!
5. Shadow Box Frame
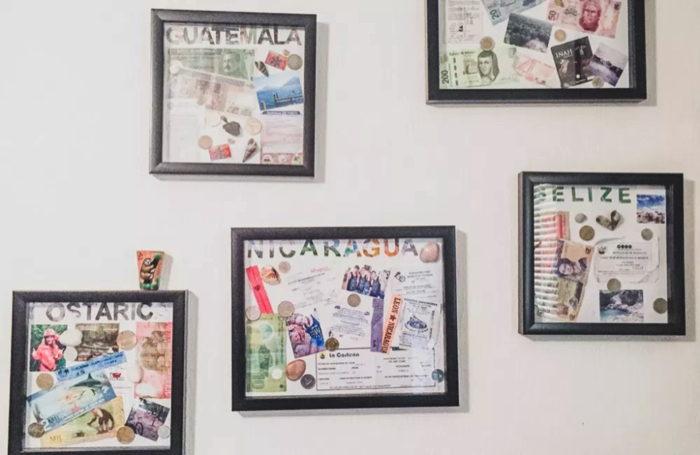
Source: Red Around the World
If you love to frame them up on the wall, check out this simple DIY shadow box frame idea. Especially when you do not know what to do with all those tickets, business cards and maps you got from the place, and it seems a waste to keep them away from sight, so this idea would be great!
Materials you need:
- shadow boxes (the size depending on how much stuff you want to display)
- scissors
- Xacto Knife
- Glue dots
- Extra fine marker pen
- Lightbox (optional to trace the country name)
- Pictures
- country name printouts
- tickets and things to put in the box
Steps:
1. First, gather all your supplies and things needed for the frame.
2. Trace the wording for the country name. If you can draw it on freehand, feel free to do so. Once traced, cut and put them aside.

3. Next, choose a background. For this, a white background is used. You may be creative by sticking a map as background or any other coloured paper. So take the back of the shadowbox and stick the background paper on it with glue dot.
4. Then now it is the time to lay everything you have on the cardboard. Feel free to move the stuff around to get the perfect angle and space and that fits what you have in mind.
TIPS: Once you have placed it nicely just the way you wanted it, take a picture of it before you glue so you can refer to it just in case the stuff got out of place.

5. Start glueing the items at the bottom then move on to the ones that overlap on top.
6. Then, place it at the back of the frame once everything has been glued and dried.
TIPS: Leave some room at the edges because things may get crumpled or covered by the frame.
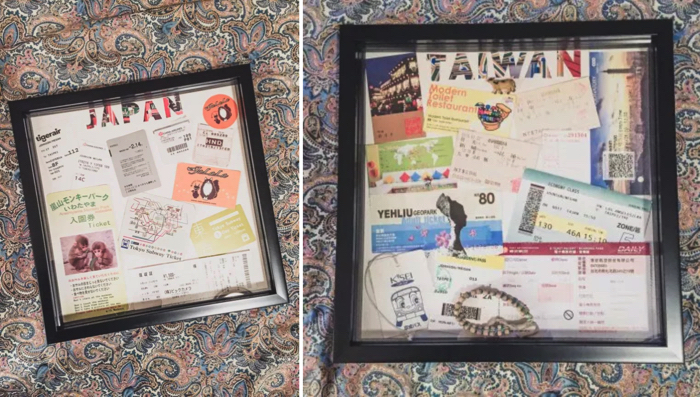
7. Then it is good for display!