6 Simple and Cuddly Ways to Repurpose Old Sweaters
 Posted by Shu Wen
Saturday 24 Nov 2018
Posted by Shu Wen
Saturday 24 Nov 2018
Share
This is probably the time of the year where you pull out your old sweaters from the closet and put them on. Looking through your wardrobe and found a piece that you don't seem to like it anymore? Or there are sweaters sitting in there for some time yet too new to hit the trash?
This is where DIY comes in to transform these sweaters into something fun and practical. This would be great to add into your handmade collections or serve as gifts during this cuddly season. Who can resist the cosiness you get from these sweaters?
Reasons why sweaters are a perfect piece to be upcycled and used in handmade
1. Easy to obtain.
Sweaters are a staple in everyone's wardrobe. So this means it would be easy for you to collect them. And it is not a difficult item to source from.
2. The beautiful knit patterns
The ready knitted patterns is where you can benefit from it. You save lots of time knitting it and yet get the same result from it. Why spend so much time knitting and learning the skills when you can leverage on the sweaters?
3. It is comfy and cosy
The material itself is soooo irresistible. Super soft and comfy which makes it an easy material to make practically anything.
Too good to be true? Let us find out what unique and creative items you can make out of the sweaters!
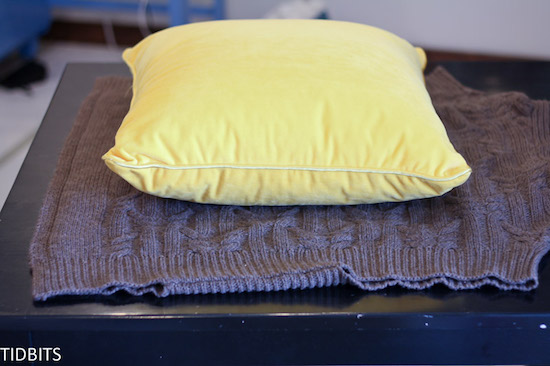
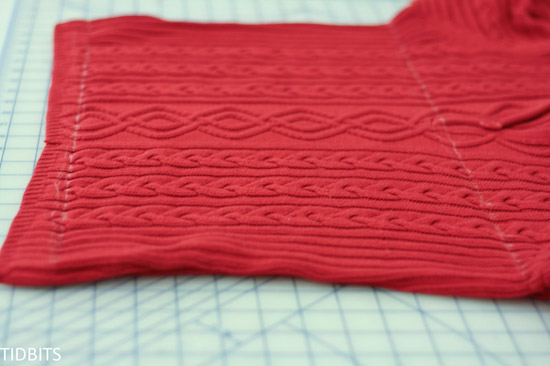
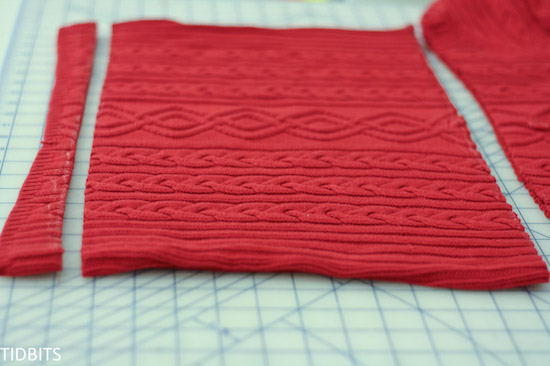
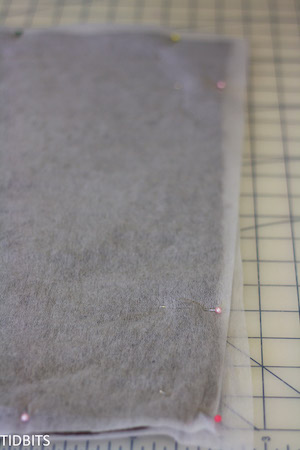
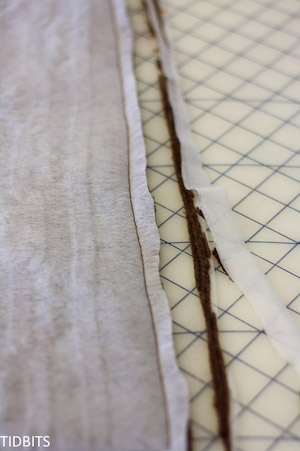
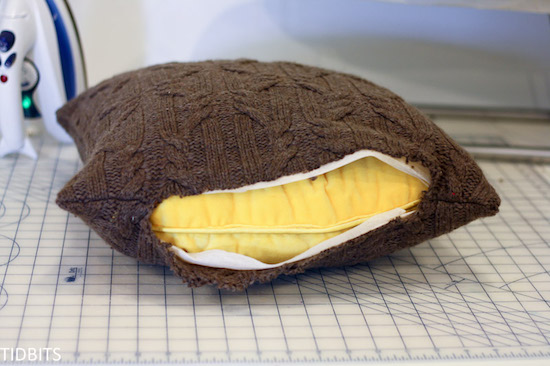
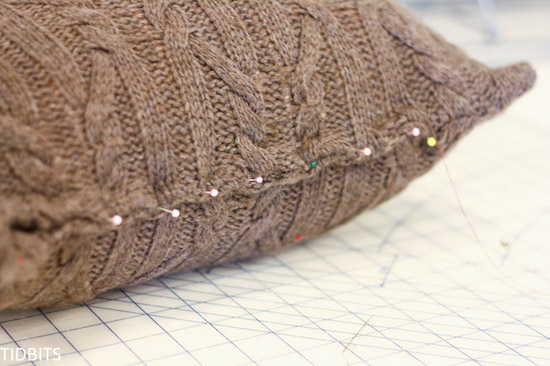
1. Cosy Sweater Pillows
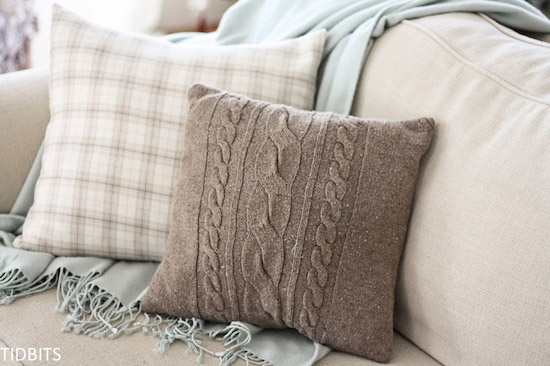
Source: Tidbits
Pillows are definitely something you would love to cuddle with on the couch on a winter and chilly day. They are perfect as decor on the couch itself even if the season has transitioned to another. You can try a variety of pillow shapes from the regular square or rectangular pillows. Do not worry if your sweaters has button ups or zip, they are perfect addition decoration to the pillows as well. For this pillow's filling, you may fill it with a ready-made pillow form or the cotton filling.
Materials you need:
- sweater
- pillow form or stuffing
- lightweight fusible interfacing
Steps:
1. Place your sweater on a flat surface. Then measure the size with the pillow form and make markings with a fabric marker on the sweater.
TIPS: Usually adding 1.5 inch would be an ideal allowance to fit the pillow form. Even if in the end, the cut out size seems smaller, it would not be a problem as well because with sweaters being stretchable, it can fit perfectly to the pillow form and stretches nicely.
2. Then cut according to the markings you have made with scissors. You would need both the front and back of the sweater.
3. This step is crucial in keeping your knit pattern in shape, the shape you want it to be! Cut two pieces of lightweight fusible interfacing according to the size of the sweater pieces.

What is it? Lightweight fusible interfacing is also known as a stabiliser. It is commonly used to add into fabrics to add stiffness effect.
4. Then arrange the pieces in a correct order. With the correct sides of the sweater facing each other while the lightweight fusible interfacing is at the back of each pieces. Once you lined properly, pin to keep them in place.
5. Pin around the edges. Remember to leave some opening for your pillow form or stuffing. For pillow form, you would need a bigger opening about 10 inches. While for stuffing, you will only need a small opening.
6. Then start sewing with sewing machine on all sides except the opening.
7. Insert your pillow form or stuffing.
8. Then, fold the edges of the opening by pinning it. And close it by hand stitching it.
2. Christmas Treat Bags
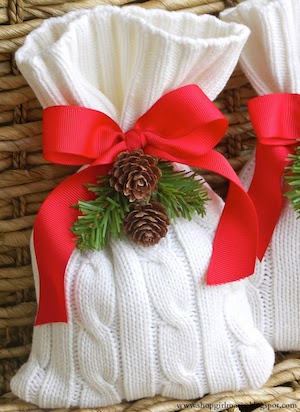
Source: A Homemade Living
As the chills sets in, it also marks the coming of the ho ho season. Having sweet treats to give out to your friends or loved ones? Use these sweaters as a unique packaging. They are absolutely presentable and reusable as well!
Materials you need:
- sweaters
- scissors
- sewing machine / hot glue gun
- decorative ribbon
- embellishment of your choice
Steps:
1. Cut your sweater into two pieces with the size of 6x10 inch. The hem will be used as the opening on the top.
2. Then, place the two pieces together with the right sides facing each other.
3. Sew the three sides with sewing machine and leave the opening. Another alternative is stick them together with a hot glue gun.
4. Once sewn or dry, then turn the bag around. Fill it with sweets or any treats you wish.
5. Finish it off with a ribbon and embellishments!
3. Knit Laptop Cover
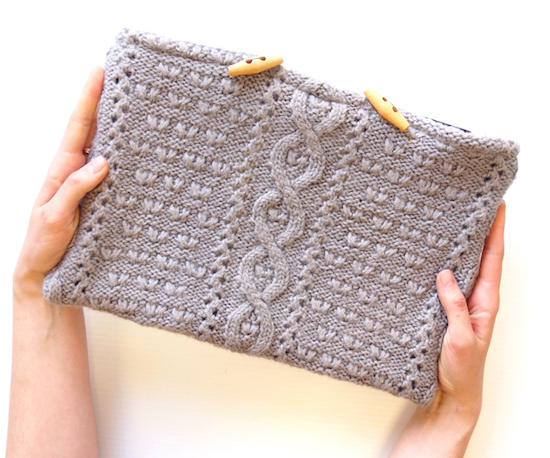
Source: Paper and Pin
Here is a simple way to make laptop cover with your sweaters or jumpers! If you need some cosiness, your laptop need some too! It does not only keep your lappy warm, it protects them too!
Materials you need:
- Knitted jumper / sweater
- Scissors (preferably good sharp fabric scissors!)
- Sewing machine
- Matching thread
- Pins + hand stitching needle
- Wooden toggles
- Waxed cotton or leather cord
Steps:
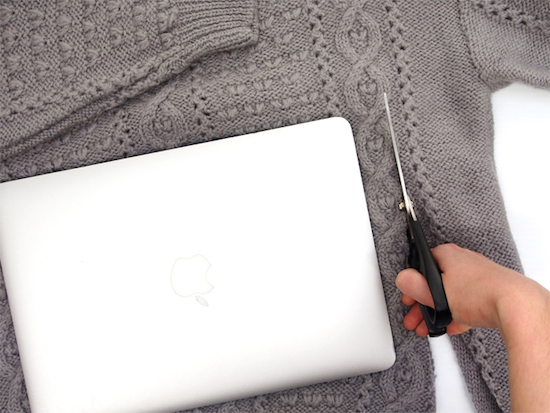
1. First, lay your jumper on a flat surface and place your laptop to get the measurement. As you place, decide on which part of the design you like.
2. Grab your scissors and cut along the sides with extra 2cm while the top with extra 5cm.
3. Cut both sides of the jumpers together. So make sure it is lay flat and nicely.
4. Then, face the right side of the two piece together. And pin the sides to keep the two pieces in tact.
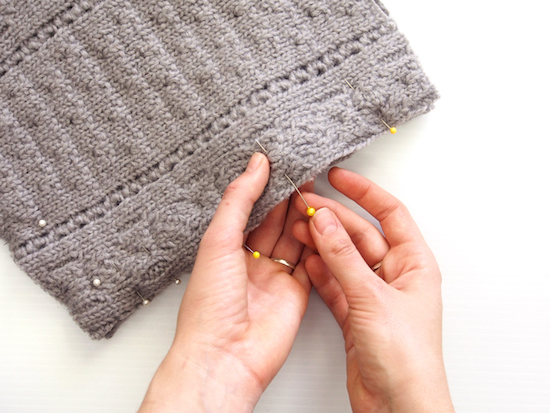
5. Once you have pinned it, you can start sewing the sides except the opening.
TIPS: It is good to try the fit by inserting your laptop in first before proceeding. If it is too big, you can stitch it closer and cut off the excess.
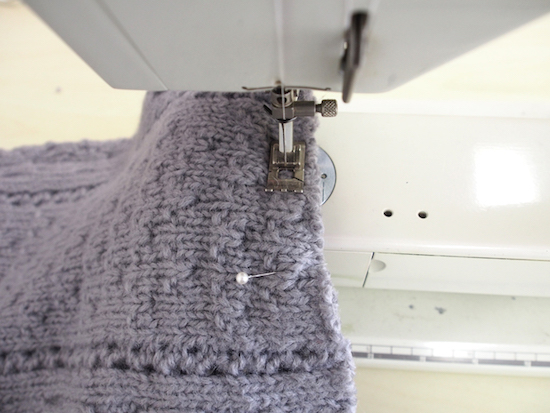
6. Then for the top, fold it over and pin it. (* the cover is still inside out)
7. Stitch along the top to create hem.
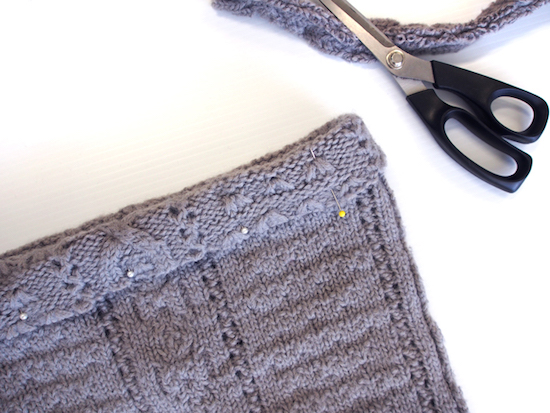
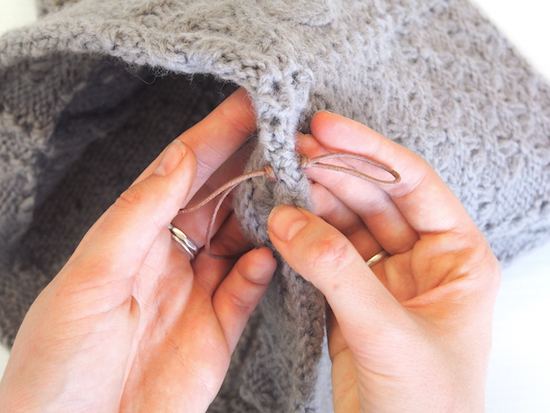
8. Attach the toggle. Position them where you want it to be and secure them with a few hand stitches.
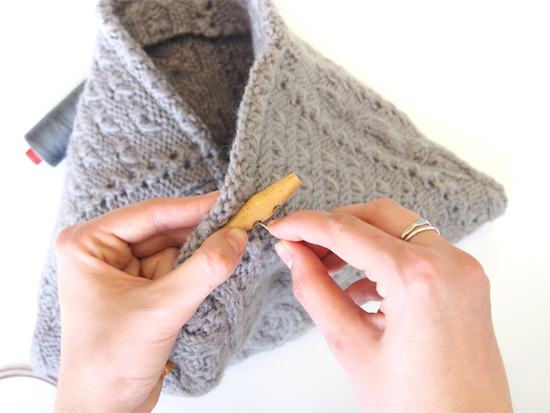
9. While for the loop, take a piece of waxed cotton or leather cord. Fold it into half and thread it through the knit and tie a knot on both sides for secure.
Then, voila, your laptop is ready to snuggle in too!
4. Scarflette (Neck Warmer)
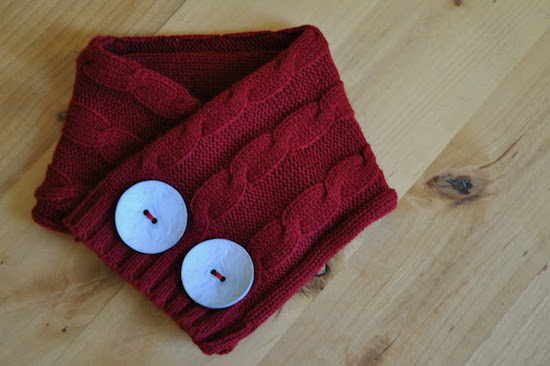
Source: I Am Momma Hear Me Roar
Keep your neck warm easily and stylishly with scarflette. Do not know how to knit one? Just make this from your old sweaters and you'll get it done in one hour and ready to show it off right away!
Materials you need:
- sweater
- scissors
- needle and matching colour thread
- giant buttons
Steps:
1. Place your sweater horizontally. You will need the body part of the sweater. Cut a rectangle from it about 8" x 29".
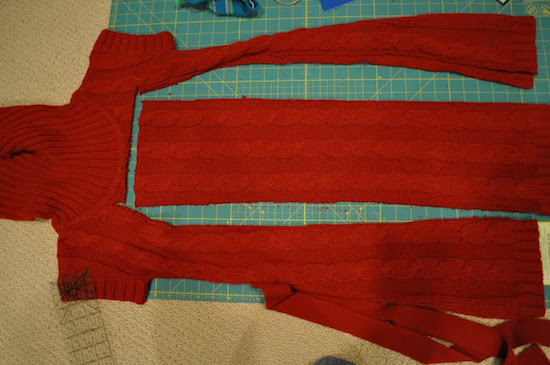
2. Then, invert the two pieces with the right sides facing each other.
3. Sew all the sides while leaving one side as opening (the hem).

4. Turn it over and overlap it. Sew it with two giant buttons. It is not real button holes as you can easily wear pull it over the head.
And.. tadaaa how simple was that!
5. Fingerless Gloves
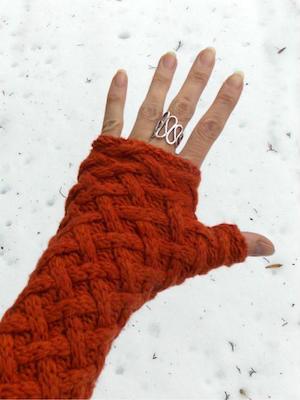
Source: Fiber Artsy
Prefer the keep your fingers free for easier grab and movements? This finger gloves is meant for you. Absolutely simple and easy to make. No knitting or crochet needed.
Materials you need:
- sweater
- fabric scissors
- sewing machine /needle and thread
- ruler
Steps:
1. For this, you will use both the sleeves part of the sweater.
2. Measure the sleeves length depending on how long you want your gloves to be. Then add another 1 inch allowance for the hem. For this example, the gloves is 9" long so it is cut off at 10".
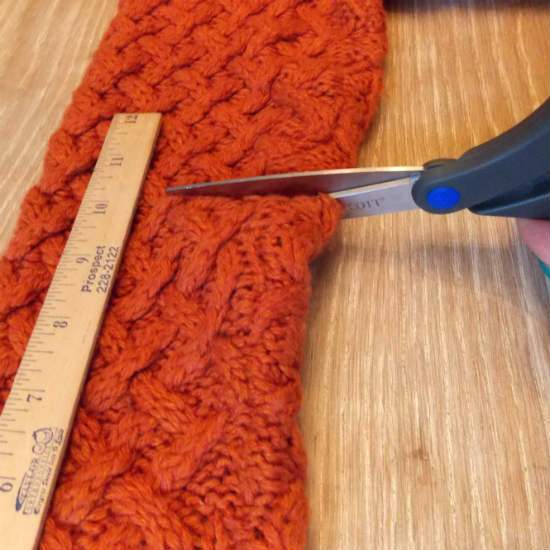
3. Invert your sleeve. Fold over the cutting edge about an inch and pin it. Then stitch it all around. If your sweater is more bulky, it is advisable to double stitch.
4. Then try it on to know where to stitch the seam for the thumb. You many an assistant for this step.
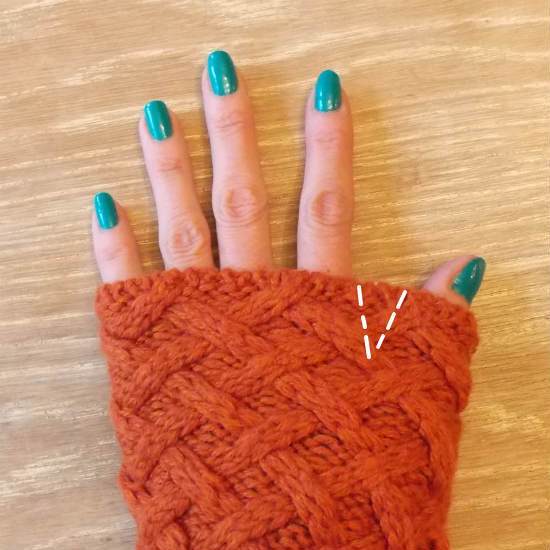
5. On the inside of the sleeve, sew a v between the thumb and index finger. Double stitch it for extra secure. Then cut out the excess.
6. Turn the gloves to the right side and proceed with the next sleeve with the same steps.
TIPS: If your sleeves are too loose and you wish to have it snug on your arms, simply fit, pin and sew along the inside.
6. Mug Cozies
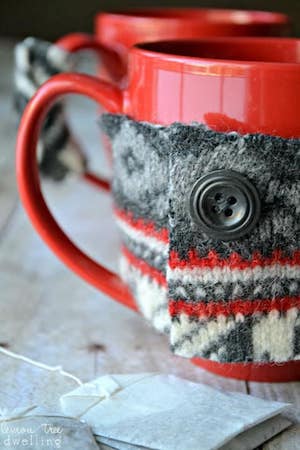
Source: Lemon Tree Dwelling
These mug cozies would come in handy especially during the chilly days. Drinking your favourite warm drink in the morning, be it coffee, tea or milk, these mug cozies would surely give an extra cosiness. Give it a new way of enjoying your warm drink and it is gonna be more satisfying for sure.
Materials you need:
- sweater with buttons
- scissors
Steps:
1. Find the buttons and cut a long strip. Make sure the length is just nice to fit around your mug. Not too loose or it'll slide away.
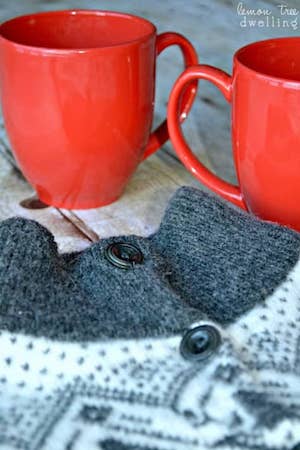
2. If it is too loose. Sew it until you get the perfect fit.
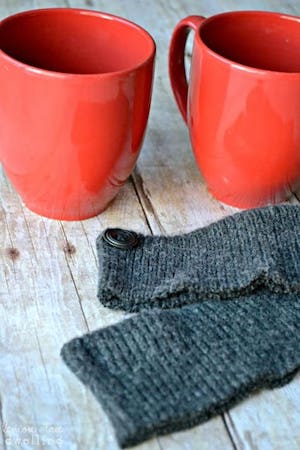
3. For something extra and creative, you can also use the leftovers of the sweaters to make handle cozy.
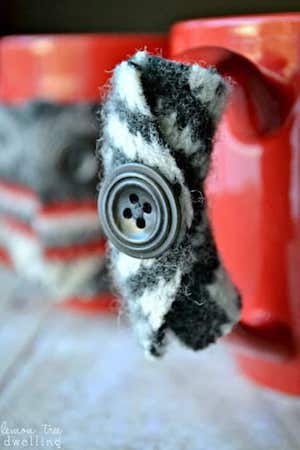
4. Just grab a small piece of fabric. Wrap it around the handle and sew it with a button. How cute is that!